Swap days and months in PHP – quick and dirty MM/DD/YY to DD/MM/YY

Problem

I have a ton of date strings in the stupid US style dd/mm/yy format. i.e. 12/24/09 being 24th September 2009. I need to convert them to the UK style dd/mm/yy.

Solution 1

As a string in PHP is really just an array of characters, the simplest fix was to address the individual number characters by their positions within the sting, and rearrange them into the format I wanted:

$d = "12/24/09";
$d = $d[3].$d[4]."/".$d[0].$d[1]."/".$d[6].$d[7];
echo $d; // displays "24/12/19".

Solution 2

I posted my solution on twitter (@hutchings) and asked for comments and @londonhackspace organiser Jonty came back with the following elegant (and much cleverer) suggestion:

$d = "12/24/09";
$d = preg_replace('|(d+)/(d+)/(d+)|', '$2/$1/$3', $d);
echo $d; // displays "24/12/19".

So provided you know that your original string is in US format, both these solutions can be used. In my testing I found solution 1 executed more quickly, but isn’t as pleasing to look at 🙂 Cheers Jonty.

Cannot set alpha on dynamic text in Flash / ActionScript 2

Problem

I’m doing some freelance Flash development, and it’s been a while. I have just created a dynamic text field that I wanted to fill via actionscript, then fade in via an alpha tween. This wasn’t working, even if I set _alpha = 0 on the movieclip containing the text field.

Solution

You can only set _alpha on a Dynamic Text field if the font has been embeded (with the embed button).

Works now! wohoo! Simple stuff that I’ve known in the past, but forgot.

Set space between list item and bullet (HTML, CSS)…

Problem

I’ve just had to convert a Photoshop visual to a WordPress template. The designer wanted a bulleted list where the bullets themselves were very close to the list items, and were small dashes. Cross browser support for list item and bullet styling is ropey at best, and to make things perfect I’d have to resort to browser specific styles.

Solution

The solution I think I’ll be using for the rest of my ‘web’ career will be this. JUST FORGET THE BULLET ITEM, and use positioned background images instead.

In the stylesheet, add styles for both the ‘ul’ tag, and the ‘li’ tag like so (explanations inline):

ul {
margin-left:0px; /* Set the indenting back to far left. */
padding-left:0px; /* Set the indenting back to far left. */
}
 
ul li {
list-style-type:none; /* Switch the list bullet off altogether. */
background-image:url(dashbullet.gif); /* The replacement bullet image */
background-position:0px 4px; /* Place bullet 0px from left and 4px from top */
background-repeat:no-repeat; /* Stops bullet tiling, important */
padding-left:7px; /* separation from li txt and bullet */
}

Then just create the list as you usually would, with ‘ul’ and ‘li’ tags. Here’s what it looks like in use:

Bullet fix in CSS

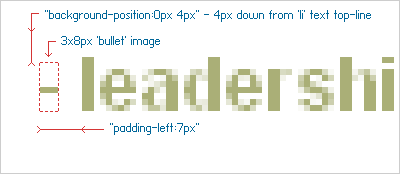
Here’s a bit more detail so you can get your head around the spacing. It’s incredibly simple, but still, nice to have a diagram or two sometimes:

Detail showing some dimensions and spacing

This style works perfectly (by my testing, but I’m not perfect) on:

  • Internet Explorer 6, 7 & 8+
  • Firefox 2.*+
  • Opera 9+ (not tested 8, but bet it works!
  • Google Chrome (all versions)
  • Safari (Mac and PC versions)
Any problems, please post a question or comment below.

Quick ‘Lorem Ipsum’ plugin / extension for IE

Problem: While doing web development, I frequently need to insert lorem ipsum into a text field or textarea. To do this – bearing in mind that I don’t really like or use bookmarks, too messy – I tend to google “lorem ipsum”, hit lipsum.com, select/copy the block of text, and then return to my form field and paste it.

I wanted a quicker solution, and as I find myself using IE more and more to develop in now (thanks to the excellent ‘Developer Tools’ extension – never thought I’d say that!) my lorem ipsum fix would have to be in the form of an IE toolbar button or menu item.

Fix: It turns out that adding a simple javascript based text field filler option to a context menu is really easy, so that’s what I did. Here are the steps:

Firstly: Create the javascript to access the currently focused field, and insert the lorem ipsum text. Create a new html file in a location of your choice –  I used C:Program FilesInternet ExplorerPlugins – and copy the following code into it:

<script language="JavaScript">
var parentwin = external.menuArguments;
var doc = parentwin.document;
var rng = doc.selection.createRange();
rng.text = "Lorem ipsum dolor sit amet, consectetur adipisicing elit, sed do eiusmod tempor incididunt ut labore et dolore magna aliqua. Ut enim ad minim veniam, quis nostrud exercitation ullamco laboris nisi ut aliquip ex ea commodo consequat. Duis aute irure dolor in reprehenderit in voluptate velit esse cillum dolore eu fugiat nulla pariatur. Excepteur sint occaecat cupidatat non proident, sunt in culpa qui officia deserunt mollit anim id est laborum.";
</script>

Save the file as loremipsum.htm.

Secondly: Create the registry entry for the menu item:

  1. Open/run ‘regedit’ (Start > run… > “regedit” > ‘Ok’)
  2. Use the tree to navigate to:
    HKEY_CURRENT_USERSoftwareMicrosoftInternet ExplorerMenuExt
    using the tree view on the left of the Registry Editor.
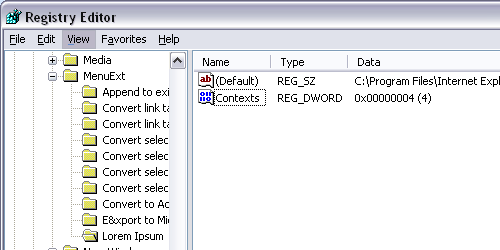
  3. Create a new key (Right click, “New” > “Key”) and call it “Lorem Ipsum” or anything you like.
  4. Inside the new key, open the ‘default’ string value that’s already there (double click on it), and enter the path to the script you created just now. i.e. C:Program FilesInternet ExplorerPluginsloremipsum.htm
  5. Now create a new DWORD value (Right click, “New” > “DWORD Value”) and rename it “Contexts”. Set the value to 0x04 (hex) or 4 (decimal). Here’s an explanation of the different values.
The new Key and values in RegEdit


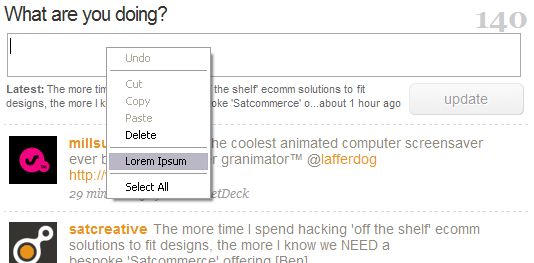
That’s it! Now open IE, find a textarea or text field, right click, and you should see something like this:

Note the new highlighted option in the context menu

Calculating parallel resistances

Problem: Parallel resistances can be are hard to understand because your dealing with a ratio not a sum. If you had two 10 ohm resistors connected in parallel, the total resistance accross the two would be 5ohms – this much is fairly easy to grasp because both resistors would share the current equally. But as soon as the values are different, each resistor handles a different share of the current.

Solution: To work out the total resistance accross 2 or more resistors connected in parallel you need this formula:

Rtotal = 1 / ( (1/R1) + (1/R2) + (1/Rn) )

Note: (1/Rn) is repeated for each additional resistor in parallel, so for 4 resistors the formula would be:

Rtotal = 1 / ( (1/R1) + (1/R2) + (1/R3) + (1/R4) )

Example: The other day I was asked if an engine temperature sender could be wired in parallel to a resistor to make a miss-matched temperature gauge read properly (short answer: NO). So lets substitute some real world values from this example problem to see how the above formula works:
R1 is the resistance of the sender at a given temp, R2 is the resistor to be used in parallel. So substitute 400ohms for R1 and (for arguments sake) 39ohms for R2:

1) Rtotal = 1 / ( (1/400) + (1/39) )
2) Rtotal = 1 / ( (0.0025) + (0.0256) )
3) Rtotal = 1 / 0.0281
4) Rtotal = 35.6 ohms

If you play about with some values you’ll soon notice two things:
– Rtotal will never be higher than the smallest Resistor used. i.e with setup above, no matter what resistance the sender reads, Rtotal will never be over 39ohms.
– Rtotal will always be at most half of the value of the highest resistor used. With above info, whatever you choose for R2, Rtotal will always be 200ohms or less.

This could get complicated if we go into WHY the person wanted to change the working range of the sender. This post if just intended to give a real world example of parallel resistance. Please question, correct or comment below if you want 🙂

Was this useful? I’d like to know with a click/tap on a thumb: Nope, not helpful...Yep, more useful than not! (No Ratings Yet)
Loading...

Moving VirtueMart: Link path problem in admin console

Problem: Just now, I needed to move a website running Joomla 1.5 and VirtueMart 1.1.2 from the development server, to the live web space. After I had moved the data, and the files, and updated the path in Joomla’s ‘configuration.php’ file, it seemed to work ok, but all the links in the VirtueMart Admin area still pointed to my development server.

Fix: After doing a ‘find in files’ for my development server’s name, I found two more paths that need changing in VirtueMart’s own configuration file. This is the file:

/administrator/components/com_virtuemart/virtuemart.cfg.php

The following two paths need editing to point to the new server location (URL):

35
36
define( 'URL', 'http://my.devserver.com/joomla/' );
define( 'SECUREURL', 'https://secure.devserver.com/joomla/' );

A simple fix, but probably worth posting.

Select template by Section in Joomla 1.5

Problem: In Joomla 1.5, at present, there is no way to set the template applied to an article or category  based on the section that article is in. Templates can be set by menu item, but not by the overall section they reside in. This means that if multiple templates are being used, each time a new article is added, changes have to be made to the template setup too – very tedious. All I wanted was to be able to create an article or category, add it to a certain section, and know that it would be rendered/displayed using a particular template:

Fix: This took some searching and tweaking. I found a post in the Joomla developers forum about someone trying to do something similar, but their example code was broken. It was enough to get me started though.

What you need to do is: find and open application.php in the includes directory on the root of your Joomla 1.5 installation. Then find line 309 or thereabouts and look for this code:

309
310
311
// Allows for overriding the active template from the request
$template = JRequest::getCmd('template', $template);
$template = JFilterInput::clean($template, 'cmd'); // need to filter the default value as well

Insert AFTER the comment on line 309, but BEFORE line 310, add this code:

// Templates by Section hack - Begin
 
$eItemView = JRequest::getVar('view');
$eItemId = JRequest::getVar('id');
 
$sectionId = NULL;
 
$eItemId = (strpos($eItemId,":"))? substr($eItemId,0,strpos($eItemId,":")) : $eItemId;
 
switch ($eItemView) {
case "article":
$edb =& JFactory::getDBO();
$eQuery = 'SELECT sectionid FROM #__content WHERE id LIKE '.$eItemId.'';
$edb->setQuery($eQuery, 0, 1);
$sectionId = $edb->loadResult();
break;
case "category":
$edb =& JFactory::getDBO();
$eQuery = 'SELECT section FROM #__categories WHERE id LIKE '.$eItemId.'';
$edb->setQuery($eQuery, 0, 1);
$sectionId = $edb->loadResult();
break;
case "section":
$sectionId = $eItemId;
break;
}
 
// Edit the section id below, you can find it in the sections admin area.
if ($sectionId == "1") {
$template = "rhuk_milkyway_red"; // Use the full template name.
}
// Add more if clauses if there are other templates.
 
// Templates by Section hack - End

Hopefully you can see what this does. It looks for the section id to use in 3 ways, depending on whether joomla is currently displaying a section root page, a category root page, or an article. It then looks to see whether that section id has had a specific template specified for it by name.

This hack works well for me, I only need to add the different template data once in application.php for a given site. Ideally someone needs to make an admin mod for this, so that sections and categories can be assigned different templates in the backend. Maybe one day I’ll make one, but not unless there’s demand 🙂

Any questions, corrections or thoughts, please comment below (no need to create an account or anything!)

Launch Google Chrome in ‘Incognito’ mode from a shortcut

Niggle: I use Google Chrome’s Incognito window mode regularly to view multiple Google Analytics accounts at the same time on one PC. It’s very useful – it means I don’t have to keep signing in and out of my primary google account – but what annoyed me each time was having to open chrome, then open a new ‘incognito’ window from there, which leaves the old ‘normal’ window open in the background.

Solution: Since Chrome came out of beta, the ‘−−incognito’ command line switch has been available.

So, to get this switch working with a short cut, do the following:

  • Copy the existing Chrome shortcut in your quicklaunch bar, desktop, or start menu.
  • Rename the shortcut to something obvious, I called mine “Chrome Incognito”.
  • Right click on the shortcut, and select ‘properties’.
  • The Properties window opens, and you can select the ‘Shortcut’ tab as shown below:
Chrome Icon Shortcut properties

Note the ‘Target’ path field

  • In the ‘Target:’ field, add the switch ‘ −−incognito’ to the end of the target path, as shown below:
Chrome incognito target path

incognito ‘Switch’ added to target path

  • Click ‘OK’ to save your changes.

There, all done, that shortcut will now open Chrome in incognito mode window. If you have other normal chrome windows open, they will not be effected by this window. For example, you can stay logged into a google account, a live account, or any other persistent cookie/session driven system. Incognito windows are also great for logging into online banking sites if you’re a bit paranoid.

Note: If you have a 0.* version you will need to upgrade to v1.* or higher.

Unable to Subscribe to Podcasts in iTunes store – Greyed Out Buttons?

Problem: You can’t subscribe to any Podcasts in iTunes music store because the the buttons are greyed out. An example is shown below:

Greyed subscribe button

Fix:This happens when the ‘Podcasts’ item is not enabled in the iTunes library. To enable it, follow these steps:

  1. Open the iTunes Preferences. To do this, either press ‘Ctrl+,’ (that’s the control key, and the comma key at the same time); or Go to ‘Edit’ in the top menu, and then ‘Preferences’.
  2. Select the ‘General’ tab, usually on the left most.
  3. Tick the ‘Podcasts’ item in the ‘Show:’ options list (highlighted below):
Select the Podcasts checkbox

Once you say ‘Ok’ to the Preferences box, the ‘Podcasts’ item should appear in the top-left-hand side of the iTunes window. If you now view links to podcasts in the iTunes Store, they should be clickable.

If you have any corrections or alternative solutions to this problem, please leave a comment!

Please let me know if this post was useful with a click!
Nope, not helpful...Yep, more useful than not! (No Ratings Yet)
Loading...

How to enable FLV file playback in IIS 6

Problem: This one crops up every-so-often, and a colleague just asked me again, so it’s probably worth posting. When an FLV is loaded into a Flash app, the FLV file is ‘played’ when the SWF or Projector is run. When this is done locally – i.e. you run an SWF from your hard drive, or file server – it’ll work fine. The problem comes when you upload it to your IIS web server. The server probably won’t recognise the ‘.flv’ filetype, so it’ll display nothing.

Solution: To make your IIS 6 web server aware of FLV files, do the following:

  • Open ‘IIS Manager’.
  • Right click on your site in ‘Web Sites’, and select ‘Properties’.
  • Choose the ‘HTTP Headers’ tab.
  • Click the ‘MIME Types…’  button on the bottom-right.
  • Click ‘New…’ and then add ‘.flv’ and ‘video/x-flv’ as shown below:
Setting FLV Mime type in IIS site properties
  • ‘Ok’ your way out, and ‘Apply’ when needed.
  • Your video should now play in a browser when embed in an SWF.
Note: You might have to stop and start ISS, but I didn’t when I added the Mime type a few hours ago.
Questions? Please leave a comment…

Please let me know if this post was useful with a click!
Nope, not helpful...Yep, more useful than not! (No Ratings Yet)
Loading...